Piercings have been on the rise since decades, but recently, they’ve been the talk of the town as people are getting their lips, chin, eyebrows along with navel and other body parts pierced which generally never used to be. They’re the top trending fashion fad these days! City youngsters seem to be gushing all over this new trend. Gaining popularity not only in America, but around the globe including UK, India and even Asia, you can see people with piercings everywhere!
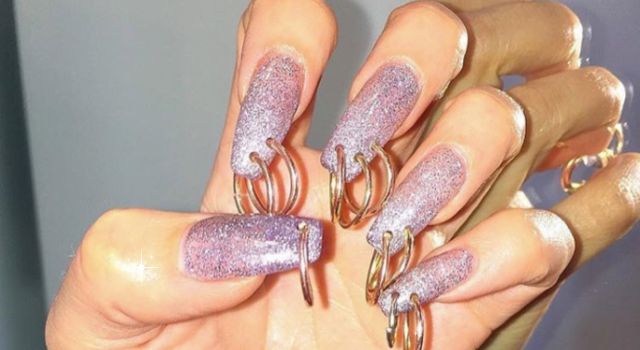
Since almost all the body parts are getting pierced, that leaves Nail Piercings as no exception. This is top emerging trend which has been associated with chicness and finesse. Most people with healthy nails go for this fashion trend to make their nails beautiful. Notably, they’re best done on acrylic or gel nails, but work well with natural nails too given that the natural nails are strong, sturdy and long. You can get one on the edges too, but in this article, we will be covering how to pierce nails all by yourself and how it works!
How To Pierce a Nail?
Generally at salons and spas, nails are painted first and then they are pierced. Once they are pierced using the appropriate tool, they cannot be painted again as it can become difficult. There, you can choose the jewelry that you want for your piercing. Rings are generally the go to choice for all customers, but other embellishments like crystal rings or stone ones can also used as per your preferences.
How Much Time Does It Take?
It takes around 10-15 minutes as it is not a long rigorous process. If you already have acrylic or gel nails on, the procedure will be done in a jiffy. If you don’t, then you may be recommended to get them at prompt as nail piercing on your natural nails can be harmful for your nail beds, causing them to become weak and break off easily.
Disclosure: This post contains affiliate links. When you purchase a service or a product through the links, I sometime earn a commission, at no additional cost to you. Read my full disclosure here.
How To Do Nail Piercing At Home
Here’s how you can pull off a gorgeous set of pierced nails in front of everyone by doing it on your own. Below is a step by step guideline given. Before heading into it, let’s discuss the items that you’ll be needing.
- First and foremost, a nail drill which can do the job well. There may be electric or battery operated ones available in the market, but for this, you may only need a hand held one.
- Nail strengthener
- Base Coat
- Top Coat
- Nail polish
- Nail buffet
Easy Steps On How To Pierce Your Nails
- Step 1: Start with near and clean, paint free and buffed nail surface. Please ensure that your nails are not covered with any kind of base coat or color. This should be done after a proper manicure.

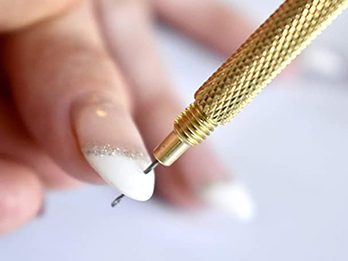
- Step 2: Use the nail driller to carefully pierce the area that you are targeting or the position that you’re targeting. You can easily get a nail driller at a nail art store. Once you’ve gotten the nail driller, make sure you’re not applying excessive pressure on your nails as you may puncture your finger’s skin.
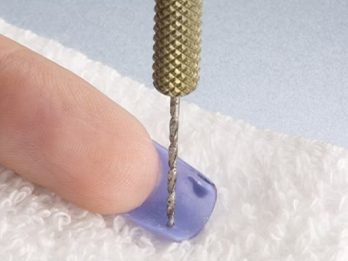
- Step 3: Start rotating the driller in left and right direction slowly by putting a bit of pressure on the nail from the opposite side, but be sure to not apply too much pressure! Please note that it’s important to do nail piercing from the inner side of the nail so that you don’t injure your skin. Keep rotating the drill on both sides till you see a hole created in the nails. Therefore, ensure that the drill goes inside and outside of it easily.
- Step 4: Now take a buffer and buff the sides of the nail. Buff around the hole that you created. You can out a base coat or a nail strengthener to prevent the nail from chipping away.
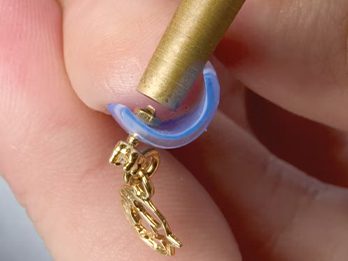
- Step 5: Now that the process is somewhat complete, add finesse to it by putting on your favorite nail polish or create the nail art that you had initially planned. Use a top coat to seal the nail art or nail polish for a glossy look and protection. Now you can take a piece of nail art jewelry and put it through the hole carefully. Press the ring of the jewelry to tighten it. You can add two or three rings too, depending upon your preferences.

Final Thought
That brings us to an end to our discussion. Make sure to follow the steps with utmost precision as doing it at home can’t be deemed as safe for the impulsive and impatient ones. You need a lot of meticulousness for this task. Make sure you’re alert and follow the instructions wisely. Best of luck for your nail endeavors!


No Comments